Man, this past couple of weeks has been a whirlwind of activity. Many thanks to all our friends and family that have helped us to pull this off and get moved in. One of the biggest continuing projects has been keeping the grass watered. It sure seems like an all day affair. Start in early morning and continue through the afternoon. Rinse and Repeat. The plus side of this, is that our hard work has been really paying off. The grass is coming in green and I'll soon be mowing... yah!! So here are some of the things I learned from this:
-Don't be afraid to get the ground saturated. As long as puddles don't stick around for more than 1 hour you'll be fine.
-Don't water at night. Watering at night can cause mold an fungus growth. We didn't have this problem but heard it from a lot of sources.
-Some spots won't get as much water as others. This can be really discouraging, but let it get you down. As long as a large portion of your lawn gets watered you'll do just fine.
-Oscillating sprinklers get more even coverage. While impact style sprinklers cover more ground it tends not to be as even. More work is involved with getting a group of impact sprinklers to water well.
-Sometimes walking on the lawn can't be avoided. Try not to walk on the hydro-seed as much as possible, but if you haven't don't be afraid to do it.
-Rain is your best friend. With the low amount of water fall this summer when we did get rain it was really helpful. Not having to water for 3 days is a God send.
And that's my sage advice on watering hydro-seed. We've been busy on a lot of other projects as well. One of prime importance, or so I was told, was putting up the blinds/shades and drapes. And I must admit, it really makes the house look "complete".
I also worked on putting in the mail box. Not the most difficult project, but not easy either. Because of the proximity to the driveway, all the soil from 4" down was mostly drainage rock. A post hole digger was not of much use, so I ended up digging most of it by hand. We dug 18" down and used 2 bags of fast setting concrete. Not too difficult but you need to make sure your post is level and that you get plenty in concrete in front of it so that it doesn't sag. They also sell a metal spike for pounding into the ground, but I didn't wanna go that route, I guess I'm just a glutton for punishment.
The next project was installing the garage door opener. This is arguably not a difficult job, but it does take some patience, and attention to detail. The most challenging part is reinforcing the garage door where it connects to the operator. They sell kits for this, but they are mostly only available only and for the most part unnecessary. What I ended up doing was taking 2 pieces of pre-punched l-bar to make a u-shape and bolting this to the very top of the top section of the garage door just under the horizontal support. I ended up bolting each piece in 3 places in addition to the 1 bolt per side for the bracket which connects the operator to the door. The other thing that I needed to do, since our garage is semi-finished, was to put an l-shaped bar on the ceiling to hole the garage door operator motor up. This wasn't too bad, but was a little odd as the spacing in the garage is 24" on center. So far everything has been great. We ended up installing a really quiet belt driven operator because the Florence model has the garage right beneath the 4th bedroom. We have used it a few times while the baby was sleeping and she hasn't woken up.
The last project that I tackled was installing the refrigerator water line. This one was fairly easy but took quite a bit of preparation. The first thing I needed to do was turn of all the water and drain the lines. I was lucky enough to only need to connect to the existing CPVC piping. If it would have been copper piping it would have been a much bigger challenge. In my case all I really had to do was glue all the pipes together and then connect the refrigerator tubing. For the tubing I used an installation kit that I picked up at Lowes. I really liked the kit that I purchased as it used quick connects instead of the typical saddle valve. I would highly recommend it.
While I was doing that, the Mrs. was busy working on getting the kitchen all set up. She had a lot of help from her aunts who made the project really quick and easy. If there is one thing I would recommend is getting the kitchen squared away first. Nothing makes working on the house easier than being able to sit down and eat or get something to drink.
We'll that's the big projects I've been working on, more to come, and hopefully I'll get some pictures up soon.
Tuesday, July 31, 2012
Monday, July 16, 2012
The Seedy Side of Home Ownership
This
past weekend was great. We had the
opportunity to enjoy a family wedding out of town the weekend before we
close. It was a nice way to be able to
relax a little bit before all the craziness of moving and home ownership
begins. While we were way the hydro-seed
was sprayed on the lawn. In preparation
for this I was up till midnight the day before we left trying to get all the
sprinklers placed in the right spots in the lawn. Not only was the process muddy, but it was
also all sorts of frustrating as I was losing daylight. To top it off right as I was about to finish
one of the sprinklers clogged and I almost lost it. Unfortunately for me, both Walmart and Lowes
had sold out of sprinklers, and I had to trek all the way to the in-laws, and then back to the new house. I cannot begin to describe how enthused I was to be doing that at 10:00 at night.
So now this week as we begin to pack up, close on the house and move I will be huffing it to the house before work at 5:00am to water for 2 hours, then heading to the house after work to water for another 2 hours. Man is this week gonna be fun.
So now this week as we begin to pack up, close on the house and move I will be huffing it to the house before work at 5:00am to water for 2 hours, then heading to the house after work to water for another 2 hours. Man is this week gonna be fun.
Thursday, July 12, 2012
It's the Final Walk-through
So today is our final walk through. Man time has gone by really quick. Before you know it we will be moving boxes, unpacking and trying to make our house a home. Now is the time for any last minute fixes/changes. Here is a good article on doing final walk-through http://homebuying.about.com/od/homeshopping/qt/Walkthrough.htm. With our home, we've been keeping up with the progress from day one, and aren't expecting any big changes from the last time we saw it. But there is still a possibility for there to be issues. Here is the cliff notes version:
"Here is a list of items to check on a final walk-through:
- Turn on and off every light fixture
- Run water & look under sinks for leaks
- Test all appliances
- Check garage door openers
- Open and close all doors
- Flush toilets
- Inspect ceilings, wall and floors
- Run garbage disposal and exhaust fans
- Test heating and air conditioning
- Open and close windows
- Make sure all debris is removed from the home"
Saturday, July 7, 2012
Cement Shoes
We finally have our driveway poured. It took a lot of fortitude not to put my hand prints in the fresh cement. We also had the cement guys pour our walkway to the side garage door. It was extra, but not too bad. Our Project Manager also surprised us by telling us that they did 4' front walkways standard in our neighborhood. It won't be long now and we'll be moving in.


I can just seem my car parked in the driveway now.


A nice view of the driveway from the front.
Now I'm Floored
Now we have something to walk on instead of OSB. How exciting. Before the floor went down the flooring guys also went throughout the house and screwed down all the OSB. This will help to prevent squeaks in the future. The Project Manager really came through on this one, because that was a big concern of mine. At this point the flooring guy also stapled down the sub floor for the linoleum. Staples every four inches!! That sure looks like a lot of work. Everything is coming together now. The carpet still needs to be stretched, but its nearly all done.


Siding is Up
My tin foil house is gone!!! I really like how our color choices turned out. And now that the siding is on it looks like a real house. The commotion that came out of car when we turned the corner and saw the house was deafening. Somebody was really excited, and I don't blame her. We'll be moving in very soon now.


Upstairs Shutters

A few view of the front of the house.

A view of the backside of the house.
Staining the Desk
So as expected the desk project has been a lot of work. The detail work on the front lid was obviously going to take a lot of elbow grease, but would have never guessed this much. I'm pretty sure I used at least 5-8 rounds of paint remover. It was well worth it. So now its time to stain. So whats the hardest part about staining? Picking the stain you want. We were looking for dark red stain so our two choices were "English Chestnut" and "Red Oak" from minwax. Well "Red Oak" won. I hope you like how it looks.


Seeing how it looks now, all the hard work getting this cleaned up sure was worth it.

I'm still now sure why anybody would ever want to paint over this. The bird's eye maple veneer is beautiful.

View of the inside of the desk. I really wanted to redo the inside to, but that just wasn't gonna happen. Way to much work. Maybe in a few years.

Another nice view of the front.

The top of the desk. Had to fill the holes on the top. They don't blend really well but its only in a few spots.
Getting Walled and Plastered

The drywall that is hung in the family room. That's some long sheets of drywall.

Drywall in the kitchen.

Nice view out the morning room. I hope they move that dirt pile.

Another view of the morning room.

Kitchen

Pantry

It's nice to see that the inspector has been there.

Taping all the seams


Stilts for taping the sealing. Can't be easy getting up to 8-9ft.


A nice view down the hallway.

Finally get to see the fireplace. It looks nice. You can also see the future tube in this photo. It'll make it easier to hook up the TV without having cords everywhere.

They started to tape up the corners


Now that the walls are up and plastered they'll be able to start panting soon.
Wednesday, June 13, 2012
Why in the heck would you cover that up?

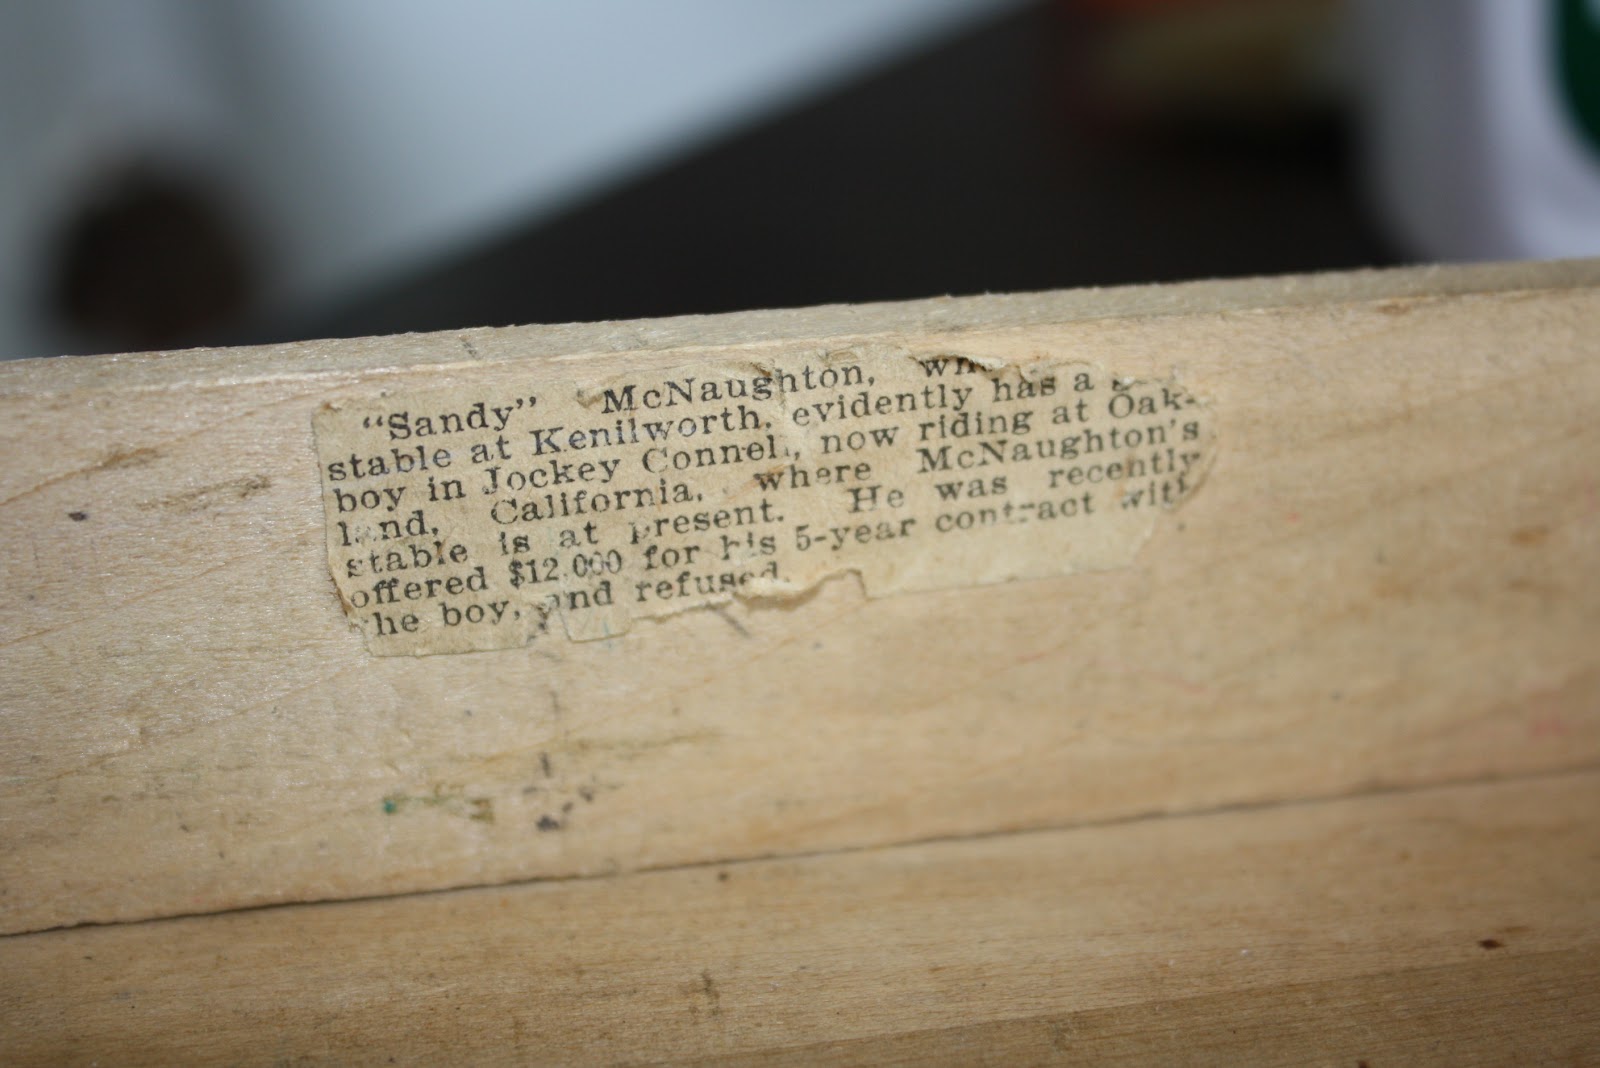
A story that we found on the back of a drawer.

Some signatures of what looks like the original owners of this desk.

So this past weekend we decided we would finally start this project and we headed to Lowes to pick up some supplies.
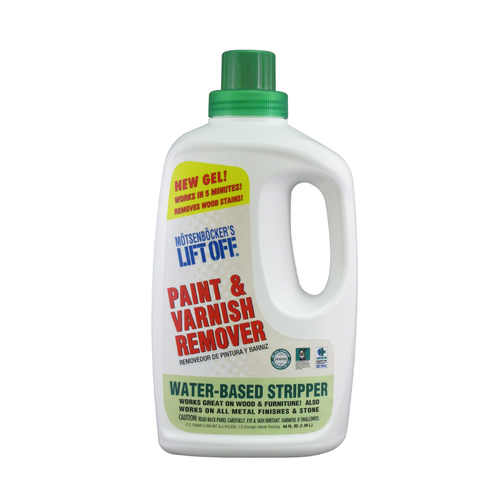
The main tool we needed was some paint stripper. We choice this one for its short dwell time and water base.

Gloves are also important. The paint remover is really nasty stuff

This tool was invaluable for getting the paint remnants removed.
So with most of Saturday ahead of us we decided to start with a small piece of the top to see how much work we had in front of us.

As you can see it was going to take more than 1 round of the paint stripper. In the end most surfaces required 3-4 applications. The first layer to come off was the brown, followed by black/red and after that a green layer. Once the paint was off there was still a layer of varnish. While it took several rounds of paint stripper we really liked that there was no excess residue cause by the water based paint stripper. This was really nice because after the last layer was removed the wood was really clean.

A couple of the drawers after being stripped of paint. You can really see the birds eye maple which is beautiful. The one on the bottom is still wet.
The most difficult part was working with the intricate details on the front of the desk. The paint remover wasn't doing so well with these sections, mostly because we didn't have a tool to remove the paint out of the corners, so we decided to try using a different paint remover.

Paint remover number two
This remover worked really well at removing multiple layers of paint but was much more difficult to remove the residue. The other thing was that the Peel Away required 3-24 hrs of dwell time. So we applied it before the end of the night and left it for the next day. Its possible that if we had used denatured alcohol, like the instructions recommended, the residue would have been easier to remove. We'll never know I guess.

A couple of progress shots.

Next Steps: We plan to sand with coarse and fine grain sand paper, and then we'll stain it.
Subscribe to:
Comments (Atom)