Introduction
So what is a garage screen anyways? Short for a kiddie corral, a garage screen is a screen that you put in place of you garage door so that you can leave your garage door open and still be able to use that space in the summer. I have also heard it referred to as a Polish patio. For us it is a great place for the kids to play outside without us worrying about them running into the street. So why didn't we just buy one? The cheap ones are fairly inexpensive, but weren't exactly what were were looking for. They don't have a real door, they just have a screen flap, and therefore can't be locked. There are places that do sell frames similar to the ones that we built but they tended to be a little bit pricey, all in all ours was about $200 to build.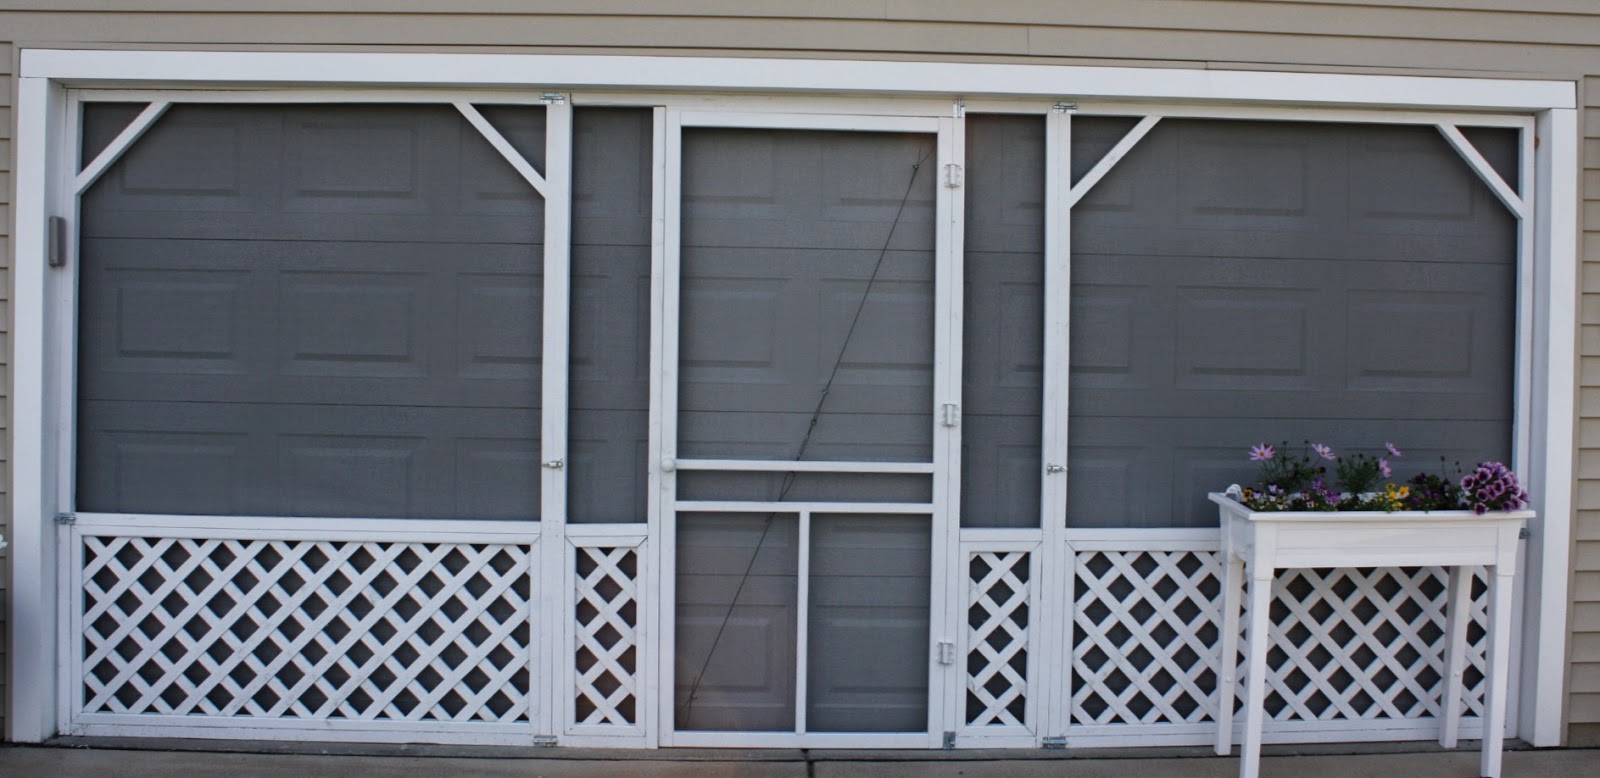
Design
So the basic design is to have 2 side panels and a middle door panel. Start by measuring your garage door opening. For our garage I measured the height in a few places to ensure that everything was even, and the width in a few places as well. If you garage door is like ours, you'll want to measure at the 1x2 trim piece that holds the rubber garage seal in place. This will ensure that you can close the garage door with the screen in place. Our garage opening was 6' 10 3/4" tall and 15' 10" wide. This will make for three 6' 10 3/4" x ~5' 3 3/8" panels. So let's make a material list. The easiest way to do this is make a sketch of your design an then count up all the components. In addition you'll need a hand drill of some sort and a saw, if you don't have a power saw a miterblock and saw would work just fine too.
2"x2"x8': 16, $26.88
1"x2"x8': 1, $0.97
Lattice Cap 8': 6, $41.82
Lattice 2'x8': 2, $17.86
Screen 72"x25': $28.97
Door 36"x80": $21.98
1lb 1 1/2" Screws: ~$10
1lb 2 1/2" Screws: ~$10
Staples: ~$10
Barrel Bolt: 8, $27.84
Cabinet Catch: 2, $7.92
Quart of White Paint: 1, ~$15
Total: $219.24
Now when you go to get your materials try to get as straight of wood as possible. This may take a while to sort through the wood at the hardware store, but you'll be glad later as working with twisted or bowed wood can be a hassle. Eight foot pieces should fit into most SUVs/Vans, and you might even be able to finagle it into a car. Now set up a work space that can tolerate a fair amount of sawdust, or is easy to clean up.
Construction
First cut one piece the height of your garage doorway. Try to get as close to the exact dimension as possible. A small amount over is tolerable, you'll want a good snug fit once everything is assembled. For me this was 6' 10 3/4". Now test the piece in your doorway, it should be snug, if it is too long cut a small amount off and try again until you get a good fit. Cut five more pieces to the same size if you doorway is even. If you have a garage doorway that is not even you will need to custom fit each piece. These are the vertical end pieces for each frame. Set them aside for now. Now is a good time also to decide if you want to make miter joints or butt joints at the corners. I used butt joints because they are easier and quicker. Miter joints usually look nicer and provide more stability, but as also more difficult and time consuming to make. If you will be using miter joints cut a 45 angle on both ends of the vertical pieces so that they look like a long trapezoid as opposed to a long rhomboid. Make sure that the long side is the same size as before and the short side is about 3 inches shorter.
There are 6 horizontal pieces that need to be cut. If you are making mitered joints cut 4 of them at a 45 so that the long side is the exact width of each panel, ~5' 3 3/8". The short side should be 3 inches shorter at about 5' 3/8". Then cut 2 pieces square to 5' 3/8". If you are making butt end joints cut the all 6 pieces square to 5' 3/8" long, this allows for the extra 1 1/2" width of the two vertical pieces.
Now we will assembly the two side frames. Assembly of the frames is made easier if you have a table large enough to put the pieces on and that you can clamp them too. Lay the two vertical pieces down with one horizontal piece between them. Starting at one side make sure that the corner between the horizontal and vertical piece is square. This can be done with a square or by making a 3-4-5 triangle or a 5-12-13 triangle, or any other Pythagorean triple. Clamp the two pieces down once they are square. Start by drilling a 3/32" hole through the vertical piece into the horizontal piece approximately in the middle of the end of the horizontal piece. This should be 0.75" from each side. This is pre-drilling the hole to help the pieces from splitting. At this point you can either screw the two pieces together with the 2 1/2" screws or make a countersink hole in the vertical piece. This will help to hide the screw head but is not necessary and shouldn't be done on the mitered joints. The miter joint is not as thick and countersinking the hole could split the wood. To countersink progressively increase the side of the hole but only going into the wood a small amount until the hole is the same size as the screw head approx 1/4". Continue this around all 4 corners and for both sides. You should now have two frames the height of your doorway and approximately a third it's width.
Now we need cut and attach the lattice cap to the frame. The lattice cap will be mitered and is framed in by the 2x2 horizontal and vertical pieces. Cut two pieces with 45 degree cuts so that the long side is 5' 3/8" long. The short side should be on the groove side and the long side should be the solid side. Now we need to make the two side pieces. First measure from the back of the lattice cap to the bottom of the groove. Write the value down. Now also measure the depth of the groove. Now double the first value and add the depth times of the groove time 0.75 and finally add 2', should be around 2' 3". This will be the length of your side pieces. It allows for some play in the size of the lattice since they can sometimes be non uniform. Now take the two leftover pieces from the previous cut and cut the ends at a 45 degree angle so that the long side is the length of your calculated value. Repeat the process so that you have 4 long pieces and 4 shorter pieces.
At this point you should have two remaining 2x2s that are 5' 3/8" left. Place a long lattice cap section on top of one of the remaining 2x2s so that the long edge of the lattice cap is on the 2x2, the edges should line almost exactly. Start by predilling a 3/32 hole 3" away from the end of the two pieces through the lattice cap into the 2x2. Then screw one of the 1 1/2" screws through the lattice cap into the 2x2. Repeat this on the other end. At this point you should be able to tell how straight the lattice cap is relative to the 2x2. If they aren't very straight, don't worry, it can be fixed. Using clamps in the middle you can get the lattice cap to be square on top of the 2x2. Once you have done this pre-drill and then screw the two pieces together. Continue this process bisecting, splitting in half, the distance between the remaining screws until the screws are ~6-12" apart. Repeat this process so that you have two pieces. Set these pieces aside. They are the top of the "picture frame" that you are making for the lattice and won't be put into place until the lattice is done.
Now we need to do a similar procedure for the sides and bottom of the picture frame. The easiest way to do this is to stand the frame upright so that the bottom of the frame is on the floor. Take a long piece of lattice cap an place it on top of the bottom 2x2. Attach the lattice cap the same way as before making sure to make the lattice cap sits square on top of the 2x2. Now turn the frame on it's side and attach a short piece in the same way. Repeat the process for the other side. You can now place a top piece on top of the two side pieces and you should be able to see the "picture frame" and the groove that the lattice will sit in. Repeat the process for the other side frame and then set the top lattice cap pieces aside until later.
Now do a test fit of the side pieces in the doorway space. They should fit fairly snug. Now measure the distance between the two side pieces. It should be around 5'-3 3/8". Take that value and subtract about 1/8"-1/4" to allow for expansion of the sections. This will be the width of your middle section.
The idea now is to build a frame with a door in the middle. This will require creating an opening that is 1/2" wider and 1/2" taller than your door. I went with as large a door as possible so that I would be able to move things in and out of the garage. This ended up being 36" x 80", so the opening for that would be 36 1/2" x 80 1/2". I only sized my door up 1/4" and I wish I would have gone larger as the door sticks when it rains. Any excess gap will be covered by a door stop.
For the middle frame there will be 6 horizontal pieces. These are the top for the frame, the door header, and 2 horizontal members for each side panel. For a miter joint cut the top piece at 45 degrees so that the long side is 5' 3 3/8" and the short side is 5' 3/8". If you are making butt joints cut it square at 5' 3/8". Then cut 2 pieces for the bottom of the side panels. For mitered joints cut these 2 pieces at a 45 degree to 1' 1 7/16" on the long side and 10 7/16" on the short side. For butt joints cut them square to 10 7/16". Then cut 2 more pieces square to 10 7/16" for the top of the lattice panel. The final horizontal piece goes above the door and should be square cut at 36 1/2" long. This should be cut our of a 1x2. The reason for this is that if your door height is like mine a 2x2 will not fit, but a 1x2 will fit perfect. You should still have 2 left over vertical pieces that you cut at the beginning but you still need an extra 2 to go around the door. These will be 1 1/2" shorter than your opening or about 6' 9 1/4". If you are using miter joints cut one end at a 45 degree angle. The last thing that is needed is to cut out the lattice caps. Cut out 4 lattice cap pieces the same size as your sides from before ~2' 3" at a 45 degree angle. Then cut 4 pieces at 45 degees for the tops and bottoms of the lattice caps. These should be about 10 7/16" on the long side.
Now for assembly of the door frame. First screw the lattice cap onto the short horizontal pieces in the same manner as before. Also attach the longer vertical lattice cap to the vertical pieces on the ends of the frame and also the vertical pieces on the sides of the door. Then attach the vertical side pieces to the horizontal top piece. Then attach the bottom of the lattice panel to these vertical pieces. This will help to get the location of the vertical pieces around the door in the correct location. Attach the vertical pieces that surround the door to the bottom lattice panel piece and measure the distance between the two vertical pieces. It should be 10 7/16". Then measure along the inside of the top horizontal piece 10 7/16" and make a mark on the wood. This will be where the edge of the door vertical pieces are attached. Screw these vertical pieces in to the top piece. You should now have 36 1/2" in your door opening. Now attach the door header to the horizontal top piece in this opening. The last thing that needs to be done is to attach the door to the frame. Center the door in the frame as best as possible and then attach the hinges to both the door and the frame. No be careful with this frame as it is not dimensionally stable because of the door opening. The two side panels will have a tendency to twist of they are left hanging.
At this point the frames are pretty much done. All you need to do now is paint them and insert the lattice and screw in the top lattice caps. Once the paint has dried you can then attach the screen to the frames. This is a pretty simple process. Start at one corner and staple the screen to the frame. Then stretch the screen to the next corner and staple the screen to the frame. Then go the opposite side and repeat. Then you need to staple the screen to the sides of the frame. I found the easiest way was to put continue stretching the screen and putting stables at the bisection of the length until I felt it was secure enough. This means stapling at the 1/2 and then the 1/4 of the length and then the 1/8 of the length and so on. Do this for all four sides.
The last step is hardware. You'll want to attach the door handles to the door first. Then it is necessary to secure the frames in some fashion. The way that I did it was to use 4 barrel bolts that attach to the frame and the go into the boards for the garage opening. I also needed to drill one hole into the concrete. I used to bolts on the hinge side of the door opening so that the door wouldn't swing all over the place. One went into the top and one went into the bottom. Then other two I attached to the side panels and the bolt into the side of the garage opening. I then attached two latches to the middle panel and the side panels to keep the securely together.
 |
| Door Handle on the Door |
 |
| Clasp Holding Two Frames Together |
 |
| Door Tensioner to Prevent Sagging |
 |
| Sliding bolt in the cement on the hinge side of the door provides rigidity |
 |
| Sliding bolt into the top of the garage door opening also for rigidity |
 |
| A sliding bolt between the panels helps keep them together |
 |
| A sliding bolt into the side of the garage opening prevents movement |
Great job, looks good. My wife and I are just under two weeks from closing on our Florence and was wondering about the Laundry room. We want front loader washer and dryer but not sure if there will be the space. I was wondering if you put in front load machines, and if so how well did they fit in your laundry room?
ReplyDeleteWe went front end loaders as well. We have the Whirlpool Duet Washer and Dryer. They fit really well and we have a set tub as well. The one thing we did different in the laundry room was to make it square. In the original plans the one corner that is closest to the kitchen is chamfered for lack of a better term. This is to give them more room for running wires up through the ducting where the cold air return is. The were able to square this corner to give the room more space. It doesn't affect the washer and dryer however, as they are on the opposite wall.
ReplyDelete